It is a month since I last updated on my modelling activities. At that time I reported that I had just started making the first regiment of cavalry for my new army. Well in the past several weeks I have only managed to finish building the regiment, the only painting done has been the priming of the flags !!!!
I have in simple truth done very little modelling for a while now. There always seems to be something else to do or somewhere to go at this time of year, especially if it involves going out in my new car which I just love to drive. Amazingly in the month I have had it I have managed some 46 mpg which for a big heavy petrol car is fantastic. That said it will cruise at 50 mph on only 1000 rpm. It must be all that technology !!!! Anyway as usual I struggle to actually recall exactly what I have been doing but I feel I have been very busy !!!!
Anyway the cavalry regiment has been built and it took quite some time. With the upgrades in troop numbers since the last full unit I made it has become quite the task to make 109 mounted soldiers.
The next job will be painting, which is also time consuming. I have also made a start on a battalion of heavy artillery but these soldiers have only had a single coat of uniform colour so far. However while taking the screws for this unit from my stock I realised I was running short of treated screws. Readers may recall that much of the screw stock I bought a few years ago was zinc plated. It is not possible to paint over that zinc coating so it has to be removed. So yesterday I "cooked" up some 1600 screws. Although I have discussed this process previously I realised I had not provided photos so here goes.
This is the product used as purchased in Wilkinsons for £1.50. Vastly better than the pickling vinegar I used to use and a lot less smelly !!!!
The picture above shows the full set up. An old towel covers the working space with two ice cream tubs half full of tap water and my wooden stirrer.
The contents of the pack of crystals are equally shared between the two tubs and stirred until the crystals dissolve. The screws are then added at a rate of four boxes, 800 screws, per tub. Note the shiny silver colour of the screws straight from the box. A quick stir and then they are left for 30 minutes.
After half an hour this is the result. Two tubs with a half inch thick topping of foam. Clearly the result of off gassing by the crystals as they dissolve the zinc. I give each tub another good stir and leave for another half hour. There is little smell but I opt to carry out this activity in my workshop with the door open, just in case.
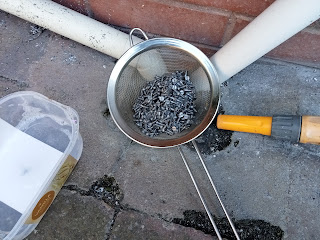
The next step is to use my dedicated sieve, not from the kitchen !!!!!! to pour the solution down the drain. A secondary benefit is that this will clean the drain !!!! I then use the hose to wash the screws thoroughly. Note the change in screw colour to gray from previous photos above.
After washing I tip the screws onto the old towel and spread them out. I then use a hot air gun to dry them off. This always results in another change in colour to reddish brown as flash rusting takes place. This is fine as this gives a much better key for painting.
After a good blast of hot air, and allowing a little time for the screws to cool down as they get very hot, they are re-boxed ready for use. This process can also be used to age modern woodworking hardware, all that is required is the addition of a good dose of WD 40 instead of the hot air gun. That drives off the water and retains the "raw" old fashioned gray steel colour by stopping the flash rusting.


