Showing posts with label Woodworking Project.. Show all posts

Saturday, 23 October 2021

WOODWORKING PROJECT. PART 6.

 This is the final part of this series of posts. Following completion of the construction process, the next task was to cut the 85 shelves. These are made from the same quarter inch (6mm) melamine faced MDF as the back panel. Each shelf is about 12 by 6 inch (300mm by 150mm). Once cut the leading edge is faced with a strip of black insulating tape to hide the "raw" edge. I have investigated the use of solid plastic edging but the cost is quite prohibitive so £1 for a single roll of tape is a bargain and also easily replaceable if damaged at any time. That said it is also a very time consuming and fiddly task.


Having made the shelves the next step was to manhandle the unit upstairs and install it underneath the existing unit which had been propped up on a couple of temporary legs since the bookcase that originally supported it had been removed. This task called for reinforcements and my youngest daughter Laraine was drafted together with my wife. My all female task force performed very well and while they held the original unit, I removed the temporary legs and put the new unit in place. The old unit was gently lowered about half an inch, lined up and the two units screwed together.


I then attached the units to the wall at the top with rubber connectors. This will allow the units to sink into the carpet over the next few months without pulling the fixings out of the wall. After say Christmas I will remove those temporary fixings and put in something more substantial. The shelves were then wiped clean and installed as seen above.


To help with the settlement issue, and to provide a better storage solution, I then loaded the shelves with boxes of unpainted screws. These will of course be removed, treated and painted over time as the new army is constructed. The final element was the new doors which were delivered yesterday and installed.
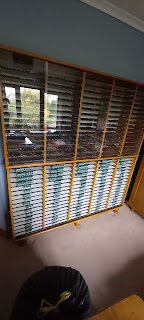


The photo above shows the whole unit. Once I have finished upgrading the existing armies, maybe in the new year, I will commence construction of my new 4th army which should take me 5 or 6 years at least to complete. I hope this series of articles has been of interest.


Monday, 11 October 2021

WOODWORKING PROJECT. PART 5.


The next task was to apply stain to the unit and then two coats of lacquer with a very light sanding between coats. The result is shown below.


 Having completed the woodworking aspects of the build I next turned to fitting out. The first task was to install the 170 shelf supports.  This material comes in 2 metre lengths and had to be cut up in 170 equal lengths on the mitre saw. Each piece then required two holes for screws. The pile of supports is shown below.


The task of fitting these supports is laborious. It actually took about six hours. As I am right handed it is only practical to do the right hand side of each upright, unless you have universal joints in the elbows or can grow a third hand of course. Therefore once all the right side supports are done, the whole unit had to be turned around  and the rest fitted through the open back. I learned the hard way not to fit the back panel first !!!!


The method of fitting the supports involves using a spacer that I made for a previous unit, its much easier than measuring for each and every support. The spacer is clamped in position, the support offered up and pilot holes drilled into the wood. Two screws are then installed. I use half inch roundhead screws which are not readily available. The standard size is three eighths but I find these are just a bit too long. Sometimes the screws meet with those installed on the other side of the timber. The half inch screws only overlap by three millimetres so just push past each other. The longer three eighths screws overlap by over  six millimetres and can be hard to drive in satisfactorily. The spacer can be seen in the photo below.


Finally all 170 shelf supports were fitted and the back panel was cut to size and pinned into the groove around the back edges of the unit. It is also pinned to the backs of the central uprights. The very last job was to cut and glue in the door tracks and the unit was finished as seen below.


The next and last post will cover actual installation of the new unit and making of the shelves themselves.


Sunday, 26 September 2021

WOODWORKING PROJECT. PART 4.

A few days ago I cut all the various panels to final dimensions. I then sprayed water on all the parts and left to dry overnight. This has the effect of raising the grain so when  sanded the timber has a very smooth finish which will not raise again when I apply the stain. After sanding I  routed all the  various grooves. 


This included a groove on the back edge of the top, bottom and end pieces to take the back panel while on the top and bottom parts I cut channels at the front edges for the sliding door track. These grooves can be clearly seen below. Also visible is the rounding over of the front edge of the bottom rail, just for decorative purposes.


The photo below shows the five feet together with mounting blocks. Due to the narrowness of the whole unit, it is not possible to have feet at every corner so I am mounting them in a line along the front edge so the unit will sit against the wall to which it will be attached. The mounting blocks are to raise the overall height of the unit so the bottom rail sits above the skirting board to avoid an unsightly gap and to keep the unit level.


Today I carried out the basic assembly of the display unit. As can be seen the central dividers sit back from the front edge to allow for the sliding door track.


The next two photos show small pieces of the door track located within the channels which I used to verify the channels were cut to the correct depths.


Having the track set into the top and bottom rails allows for the maximum use of the internal space and also just looks better too.


The photo below shows the feet mounted on the blocks. The blocks will be glued and pinned underneath the bottom rail later. It is easier to work on the unit without the feet as having a single row of feet makes the unit unstable during the finishing process. 


The next job will be some final sanding then application of stain and lacquer and fitting of the shelf supports and back panel.


Sunday, 12 September 2021

WOODWORKING PROJECT. PART 3.

 As mentioned a while ago, I have been waiting for some time for my timber yard to obtain the quarter inch thick white melamine faced MDF sheets needed for the back panel and shelves of my new display unit. I am pleased to report these sheets have now been delivered cut to my specified sizes. 


My workshop is just too small to be able to easily handle 8 by 4 sheets so I get the timber yard to break the sheets down to manageable sizes which I can then cut to final dimensions. Also seen in the photo are the two 16 foot and one 6 foot long planks which will provide the actual frame of the display unit. In the past I have always used factory made sheets of 8 by 2 foot pine and cut the various parts from them. However as previously mentioned these panels are next to impossible to obtain at the present time so I opted to buy regular planks which I can cut/join together to make  the components. It is not a good idea to use very broad planks of solid timber to make anything as they are prone to warping and twisting. The factory made panels I usually use are made of strips of wood only two inches wide. I have found that when I make panels the best size of plank to use is about 4 to 5 inches.


The machine I use to make panels is the biscuit joiner. This cuts slots in the edge of timber planks into which are glued biscuits of beech as seen in the plastic box above.


Shown here is a slot full of glue into which the biscuit is inserted. The edge of the plank is then glued together with the exposed part of the biscuit and the next plank laid on top.


Once all the planks are attached together the whole thing is clamped up and left to dry overnight.


The reason for the central clamp being located on the other side is to stop the boards bowing out under the clamping pressure of the outer clamps.


Shown above are the top and bottom panels which I made a few days ago. You can actually see the three planks they are made from on the panel to the rear. The colour variation will disappear during sanding after which they will be cut to final size. The two panels I made today will each be cut in half to form two of the central uprights of the display unit. The other two will be made from the shelves of the redundant bookcase which I need to dismantle shortly. I see no point in wasting perfectly good timber if it can be easily reused.

Just as a reminder of what I am making , below is a photo of an existing display unit above the bookcase that will shortly be removed and re-purposed. The new unit will be located where the bookcase now resides. Each of my three existing display units is about 5.5 feet long, 2.5 feet high, 8 inches deep including decorative overhangs and has 80 shelves which give 40 square feet of shelf which accommodates a complete army of c.20,000.


The next posting will cover cutting panels to size, routing of door track and back panel groves and re-use of the redundant bookcase.

Thursday, 5 August 2021

WOODWORKING PROJECT. PART 2.

Having allowed the glue on the new bookcase to dry over the course of a couple of days the next task was to cut off the surplus dowel rods used to fill the "pocket screw holes" and sand the dowels flat. In the photo below you can just see the dowel used to fill the screw hole attaching the bun feet sanded down.


The next picture shows the top with rounded over corners and edges.


The next step in the finishing process was application of two coats of Antique Pine stain. Although all our furniture downstairs is oak, upstairs the colour of choice is antiqued pine. The photo below shows the unit after those two coats. Also shown below , because I forgot to photograph it before staining, is the dowel rod in a "pocket screw hole" cut down and sanded flat. As can be seen the effect is of a lozenge shape. This looks quite attractive and eventually after finishing is complete it almost disappears.


This photo shows the whole unit fully stained.


After staining the unit received two coats of lacquer with a very light sanding between coats. The next photo shows the unit in its new permanent home after the lacquer dried overnight.


The final touch is a light waxing. Although the unit looks wider at the top than the bottom it is in fact quite square. The strange shape is caused by the funny angle I used to take this photo.


Just for interest, the dimensions of the unit, including overhangs and bun feet are: length 39" 990mm, width 18.5" 475mm and height 36.75" 935mm. The total shelf space is 216" (18 feet ) 5490mm (5.5m ).

I am currently awaiting delivery of the timber for the new modelling unit itself and will post on the construction of that unit just as soon as work gets underway.

Tuesday, 27 July 2021

WOODWORKING PROJECT: PART 1.

I mentioned sometime ago that having almost completed my three armies, I now wanted to build a new display unit to take a fourth army , the construction of which would keep my hobby going for another 5 to 6 years at the least. The problem was , where to locate the new display unit having already exhausted the available wall space in both our spare rooms. Strangely my wife was not keen on having the new unit in either our bedroom, the dining room or even the lounge. 

After much consideration I concluded that the only practical place would be underneath my third display unit which currently sits on a bookcase. My idea was the remove the bookcase and use the space thus available. However, having so many books we could not afford to lose 15 feet of bookshelf. I therefore decided to build a free standing double sided bookcase which could sit in the middle of the room alongside the stereo tower.

The current arrangement is shown below.


The project involves three stages. First I need to build the new bookcase. Second I will build the new display unit and thirdly I will  carefully remove the old bookcase while supporting the existing display unit, fit the new unit underneath and securely attach both together and to the wall.

To build the new bookcase I am using manufactured pine boards that come in 8 by 2 foot panels. These are made up of small strips of timber glued together and planned smooth. Although expensive they save a lot of time in making and finishing my own panels. When building with hardwood I always make my own panels using "biscuit" joints. My first job was to cut all the component parts; a top and bottom, two side panels, two shelves complete with supporting rails and  top and bottom rails. I already had a set of bun feet in stock left over from a previous project. The photo below shows the various parts cut to size including the bun feet  just visible in the top left.


The next step was to attach the rails to the two central shelves. These rails are fixed to the top of the shelves. They serve three purposes. As the bookcase is double sided, they will stop books being pushed back onto the other shelf. They also provide some addition strength to the shelves and lastly, as the bookcase has no back as such, it needs some sideways bracing. The four rails altogether provide this bracing.


The photo below shows the top and bottom panels ready to have the corners and edges rounded over which I do with the router. After that all the pieces were sanded then wiped with a wet sponge and left to dry. This raises the grain so that after another sanding the wood is smooth enough not to require any addition sanding other than a light wipe over with "wet and dry" during final finishing.


The whole structure is assembled using "pocket screw joints" and glue. I find this method gives the strongest joints for units made of panels. I have a jig to make the pockets and use special screws to make the connections. The photo below shows the unit fully assembled with the bun feet also attached.


In order to hide the "pocket screw" holes, I glue lengths of pine doweling into the holes  as can be clearly seen below. I also used a piece of dowel to fill the holes for the screws that hold the feet to the base.


The unit will now be left for a couple of days to allow the glue to fully set up. My next report will show the finishing process.